Thursday, October 15, 2015

East End Painters Dinner

Every year the local decorative painters society has a fund raising dinner...everyone brings one item for the Chinese auction...My Mom, sisters and myself go together and its a great night out..no kids...no husbands!!  Always great fun...I wanted to share my offerings with you for this year...Im impressed even myself..


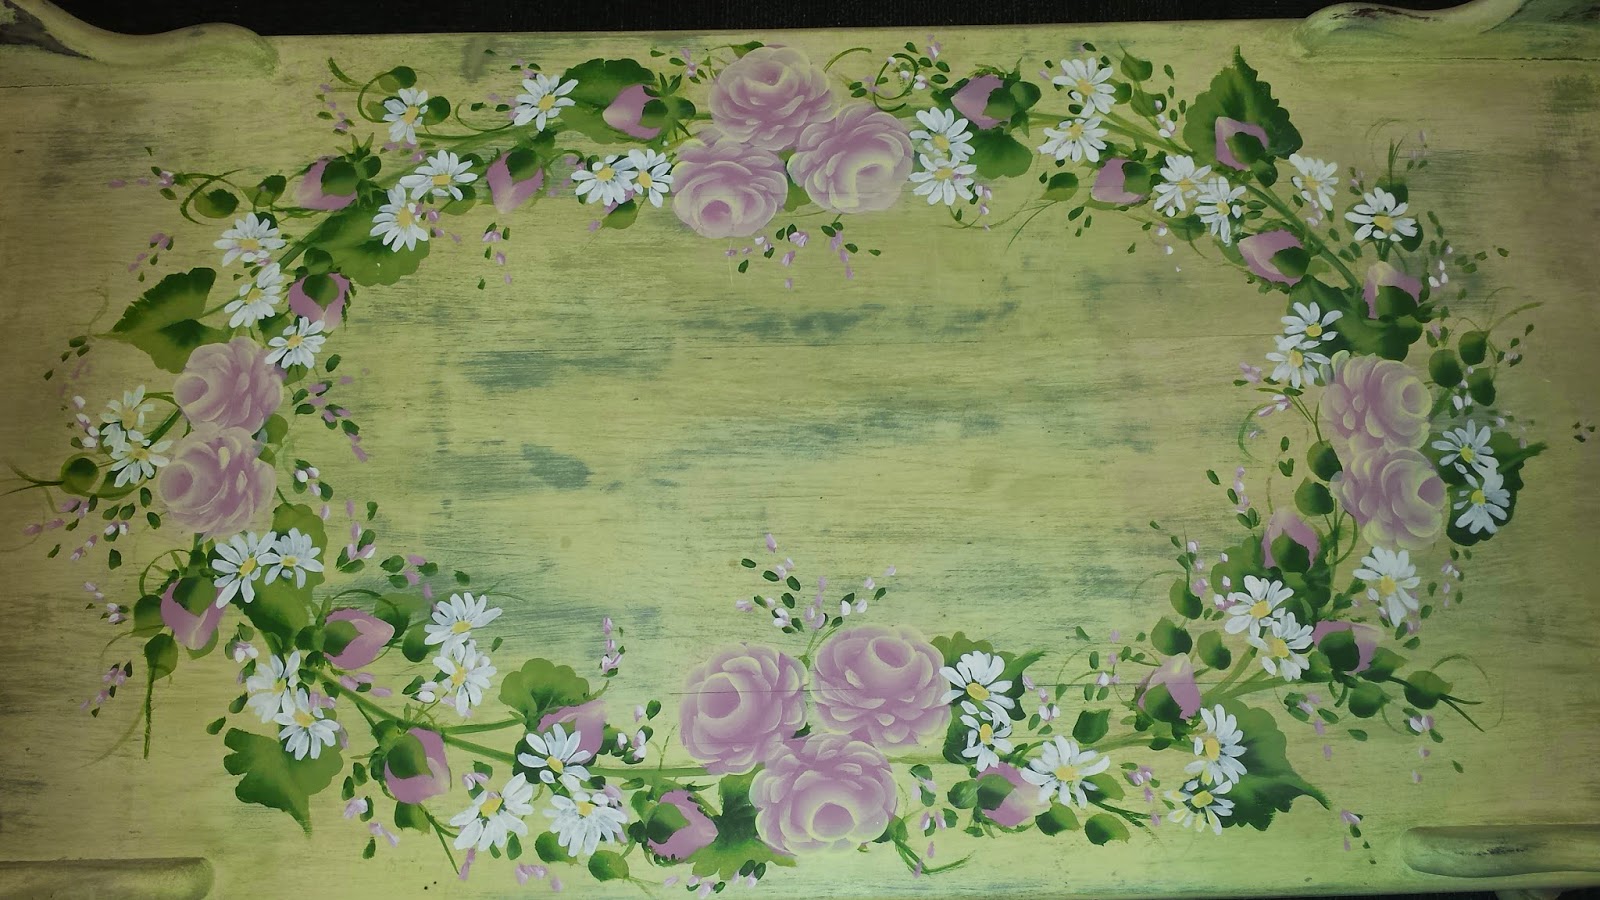
The first item is a wine rack made from pallets...this came out so good I think Im making one for myself this weekend!!!  I know exactly what wall Im gonna put it on....I hand painted some roses in each corner and then painted 4 glasses with 4 different color roses...its 40" wide by about 20" high... a real solid piece of furniture.

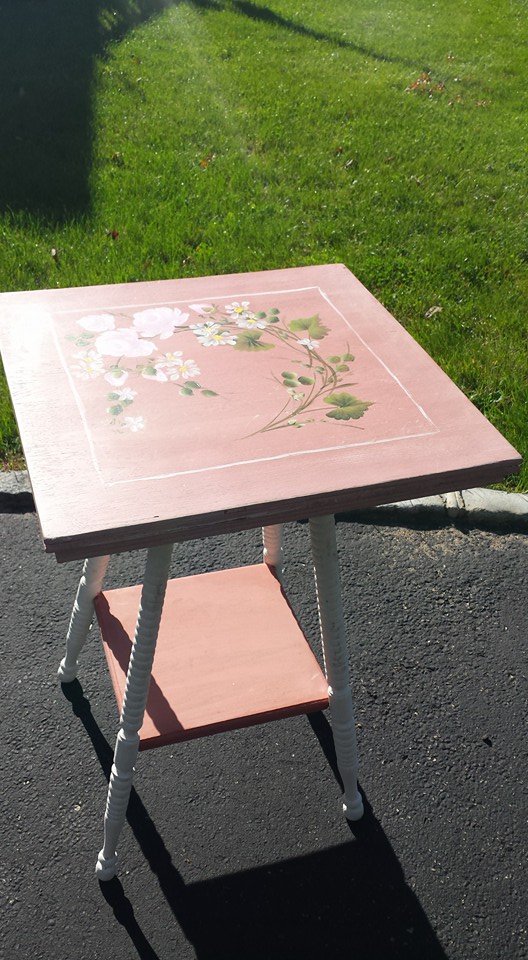
Then because Im crazy!!!  while out on my morning walks I came across 2 tables some one threw out...just sitting there so sad on the side of the road...once I finished my stroll, I jumped in my car and was happy to see they were still sitting there...I took one of those bad boys and painted the base with Annie Sloan Chalk Paint..white on teh base and Scandinavian pink for the table tops...then painted some big fluffy roses...rosebuds, daisy's and greenery...what do you think...not bad for someones garbage....

Thursday, August 27, 2015

Colonial Dresser Re-do to a gorgeous Shabby piece!!

Recently I walked into my shop and found a dresser sitting there compliments of my neighbor..at first I wasnt sure what I would do with it and then the ideas started rolling in...

I removed all the hardware, and then took a look at what I had to work with...the top two drawers were very small so I decided to remove the drawers and the dividers and use large baskets instead..

I added pallet wood to both sides and top and bottom to give the baskets a place to sit...then I painted the whole dresser (minus the top) with 2 coats of Annie Sloans Pure White, the drawers and top of the dresser I painted Scandinavian Pink.. 


Once I had everything painted I took a sanding block and distressed the whole dresser to let the dark stain peak through...I watered down the pure white and did a white wash on the drawers and top just to give a little bit more of a weathered look


I found a great stencil from Suite Pieces called Paris love letters, and used that on the 3 drawer fronts using Annie Sloans Chateau Grey and then following up here and there with some of the pure white.  I was able to find the perfect size baskets at TJ Maxx for $12.99 each and spray painted the original hardware in a metallic silver by Rustoleum...I am in love with this piece..It is finally installed in my daughters room and it looks AWESOME!!  Wait till you see what we did with the drawers!!


Wednesday, May 6, 2015

Awesome Graduation Keepsake

We recently celebrated senior night for my twins lacrosse team.  This is a pretty close knit group of girls so wanted to so something really special.  So I went through pinterest and came across a great idea at http://www.houseontheway.com/.  Photo collage on a large 10" wooden letter..The girls loved it!!!

I started with a 10" letter, and I painted the back and the sides with white..


Then I went on a mission to find pictures of the players...once I found one I liked I would copy and paste into a word document.  Then I printed them out in greyscale.  I had to cut out each one and began trying to figure out where to place them on the letter and then decoupaged them with Mod Podge.


Then I went in and printed out little words and sayings that they related to...look how cute they came out!  They were a huge hit, all the girls were saying they were bringing them when they went away to college


Once they were all done I had to figure out a special way to present them..I started thinking...my favorite thing!! Pallets!!!!!  I made a basic 10" x 12" wooden box and then using chalk board paint made little placards on the front, I thought this would be awesome for them to take to college to put all their little personal items .  This for a little extra bling...I added some string bling!!!  Look how cute they look!!!

Wednesday, April 22, 2015

Road Side rescue!!!

One day driving out of my neighborhood I came across this poor baby in the garbage...it was badly abused..looked like it was being used to hold the spackle bucket in a renovation!!


I jumped out of my car and grabbed it, my kids absolutely love when I garbage pick!  Once I got it home I just used a scrapper to get most of this mess off the top.  I sanded down the rough spots and painted a few coats of Annie Sloan Chateau Grey...and then a couple coats of old white.  I distressed the top using a sanding block and in some spots my orbital sander.  After I was happy with the colors I got to work on the design.  I added a beautiful wreath of gorgeous pink fluffy roses, rosebuds and daisy's.  I am in love with this table.  So shabby chic, I think it would look great on a covered porch with white wicker ....next time your out and about, if you see a little gem on the side of the road pick it up...give it a new life and a second chance!!


Monday, April 20, 2015

Reclaimed Pallet Wood Console Table

My Niece moved into her new apartment and wanted something hand made.  The possibilities were endless!!! I couldn't decide, and then it finally came to me, a table they could put by the front door for their keys and phones...but then if friends came over they could wheel over to the living room as an extra table for drinks or appitizers. I had a bunch of pallets in my little shop, so I started breaking then down...still not really sure what the design would even be...I did use pine 1x2's for part of the frame just to make sure it was sturdy, but then used the pallet wood for everything else.  I started with the braces from the pallet as the legs.  I loved the way they had those little cut outs..I took 2 from a 40 x 48 pallet and cut them in half..making sure the cutouts were even on all four.  Using the 1x2's I made 2 rectangles that were about 17 1/2 x 38" and then also added a center piece in the middle to to give the table more stability..I joined 5 40" pieces of wood together with biscuits and making sure the whole thing was square I attached it with my nail gun..


I added pieces of wood to the bottom to make a shelf and then wrapped it with more pallet wood...


The more i looked at it I realized that it needed a shelf in the middle,  I dont know about you guys, but alot of times I have to wait for the project to tell me what to do!! I only added supports to the long sides and then attached shelving using the nail gun again.  I wrapped the top and middle shelf with pallet wood to give it a finished look...


I added crystal pulls to make it look like there was a drawer and castors to make it a little taller and mobile...I found a great basket at TJ MAXX and stained the whole thing with weathered oak by Min wax...it came out so perfect considering it was all just in my head.  

Friday, April 17, 2015

Easy Recycled Pallet Frame

I've become obsessed with anything pallet!!  I've made a few things from pallet wood and how can it get any better...typically decent wood...for free!!  Usually my husband goes behind the super market grabs a couple, he tries to get assorted colors and sizes.  When he brings them home its better then a dozen roses.  I wanted to share a quick project I just finished, that looks awesome.


I used a pocket hole jig and Gorilla glue to join the wood together..then had a 20 x 30 picture printed from Costco (for $10 mind you) and added some molding...a real statement and it cost almost nothing!  Now...can we take a minute to talk about the awesome picture I used, my very talented sister, Kimberly Pinto Photography did a great photo shoot for me.  I have 3 sisters and 3 daughters...and I thought this pic showed sisterly love...

Thursday, April 16, 2015

Awesome DIY Bench for the front porch

I came across some pretty cool free DIY plans for a double chair bench with a table in the middle, I have been looking for something to put on my front "stoop" (I think thats a NY word!)...DIY Pete did a great job on making these plans easy to understand.  I was able t o put this together in one day, I made a footrest/table to go with it...Mama likes to put her feet up when drinking a glass of wine and watching the neighbors! You can find the plans on DIY Petes site.. he has pictures as well as a little video..

My husband helped a little bit on this one, trust me that is hard to admit :( we went to Home Depot and got the material..we choose pressure treated wood, and man is that stuff heavy!! The lumber cost under $80...spent a little more on screws and Spar Urethane.


We made all the cuts, being sure to label everything as the cuts were made which made it super easy to put together..


And here is the finished product...Im staining them a darker color and then will add the Spar Urethane which is supposed to be really effective when getting full sun all day.  I think it came out awesome, once the garden is put together and all bright and shiney the whole thing will look so pretty.  I was thinking on the next one I make that I would put the boards on the back up and down and put a curve on it..I saw one person put a cooler in the table.  My husband liked that idea!  The foot rest was easy to put together, basically made a rectangle base, added legs, Used 1 x 4's for the top and the trim around.  


Wednesday, April 15, 2015

Sad little Coffee Table :(

My Mom had originally taken this drop leaf kitchen table, cut the legs down and made it a coffee table...great idea right??  She gave it to me a bunch of years ago, and it sat in my den and the kids did everything from eat to paint on it.  My sister needed a coffee table and this bad boy had now been shoved in a corner of the basement..

This thing was BEAT UP...I didnt really get a very good before picture but you get the idea...I took the whole thing apart and started sanding..I painted the base with Annie Sloans Graphite, and did a Mahagony stain for the top.


After it was all put back together, I hand painted some roses in an oval pattern and then added the word Family, I mean it was going in the family room at my sisters!  This table came out so nice, it was a piece I had laying around and the transformation cost nothing!  As the weather gets nicer, start looking at those garage sales and dont walk past these little treasures.  With a little elbow grease they can become gorgeous!


Welcome to my crazy world

Welcome to my little corner of the world.  My Name is Debi, I am a Mother of 3 very active college students.   I love to go into my little shop and start building something.  I love everything creative!  Refinishing old furniture and making the discarded...beautiful, is so calming.  We have moved from refinishing to building and now my husband and I have started renovations on our house...not sure if my marriage will survive it!!!